

blackdogg6164
Member
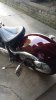
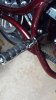
installation of non BDM mounts, footrests and pillion seat for my 2008 Big Dog Pitbull
after pricing ALL of the components for BDM OEM pegs and mounts, I decided the 430.00 price tag was a little too much for me so
I spent a few weeks researching and examining my issue with the orientation of the peg mounts (2 one above the other, 7/16" hole,
forward facing) and what my pockets could afford and my girlfriend asking me when after 2 years can I ride I got to work. I created a cost
effective solution that is functional, safe with chrome as only a Big Dog bike should be. first, I used a step up bit with my high speed drill.
be very careful not to hit any painted surfaces by rushing. the bit will do the job in a minute or so. clear out any burrs you may have
and check the clearance with the bolts supplied with the mounts. they will not be used in the construction because there is not enough
clearance to use a socket. hence, the 1/2 " cap screws were called upon as my fastener of choice. do NOT forget to use the internal
tooth washer that comes with the mounts.
items that WILL be necessary for installation:
HIGH SPEED DRILL (I used 1/3 HP electric)
3/8" SOCKET WRENCH/ EXTENSION with various hex head bits including a 1/2"
BLUE LOCTITE
ELBOW GREASE
items that will NOT be necessary for installation:
LOCK PLATES
1/2" FASTENER
BOTH OF THESE COME WITH THE KURYAKYN MOUNTS
once you have opened up the holes to accept the 1/2" cap screws and the clearance has been checked, sweep up the shavings immediately.
make sure the floor work area and the mount area is clean of all metal.
using the instructions that come with your mounts and pegs, assemble them according to the directions. tighten the clevis and pegs to specs
BEFORE you mount the items. it is a bitch to have to do after you have used the Loctite and the pegs are on the bike already. I know. needed
an allen wrench and vice grips to remedy my oversight.
once you have constructed ONE peg, loosely tighten it on the bike and see how it looks. I tilted my isolation pegs slightly backwards so
a rider can get a better hold during braking. do the same for the other side, mirroring the setup for an isometric look. tighten everything
(I did for 24 hrs) as tight as you can. (DO NOT LOCTITE YET)
OK, it is 24 hours and now it is time to back off the mounts/ pegs until they are loose. unseal your Loctite blue and drip some on the threads while
the pegs are still attached. no need to remove the cap screws completely, just enough to expose the threads. after a semi generous amount has been applied, re-tighten your screws.
make sure the pegs are level in the rolling position (upright). torque the shit out of them. I will add some better pics and the 3" leather pillion seat that she says is very comfortable ASAP.
let the bike sit for another day or so.
choose a pillion of your choice.
make sure the chick is cute.
ULTIMA LEATHER PILLION PAD FOR SOFTAILS
http://www.ebay.com/itm/121780025045?_trksid=p2057872.m2749.l2649&ssPageName=STRK%3AMEBIDX%3AIT
LARGE ISO PEGS W/ MALE MOUNTS
http://www.kuryakyn.com/products/589/iso-pegs
KURYAKYN LONG RIGHT ANGLE PEG MOUNTS
http://www.cruisercustomizing.com/long-right-angle-mounts-only-pair/part/KY-4503?utm_source=adwordsfroogle&utm_medium=cse&utm_campaign=adwordsfroogle&utm_content=11789&gclid=CPyZofChh84CFQdehgodCLgOOQ
TITANIUM NITRIDE HIGH SPEED STEP UP BIT
http://www.harborfreight.com/1-4-quarter-inch-3-4-quarter-inch-high-speed-steel-step-drill-44460.html
INTERNAL HEX SOCKET CAP SCREW 1/2"
http://www.homedepot.com/p/Crown-Bolt-1-2-in-x-1-1-2-in-Internal-Hex-Socket-Cap-Head-Cap-Screws-50724/203087773
LOCTITE BLUE
http://www.loctiteproducts.com/p/10/15/t_lkr_blue/overview/Loctite-Threadlocker-Blue-242.htm
Attachments
-
 3.4 MB Views: 320
 -
 2.7 MB Views: 304
 -
 2 MB Views: 121
 -
 1.4 MB Views: 121
 -
 1.7 MB Views: 110
Last edited:
